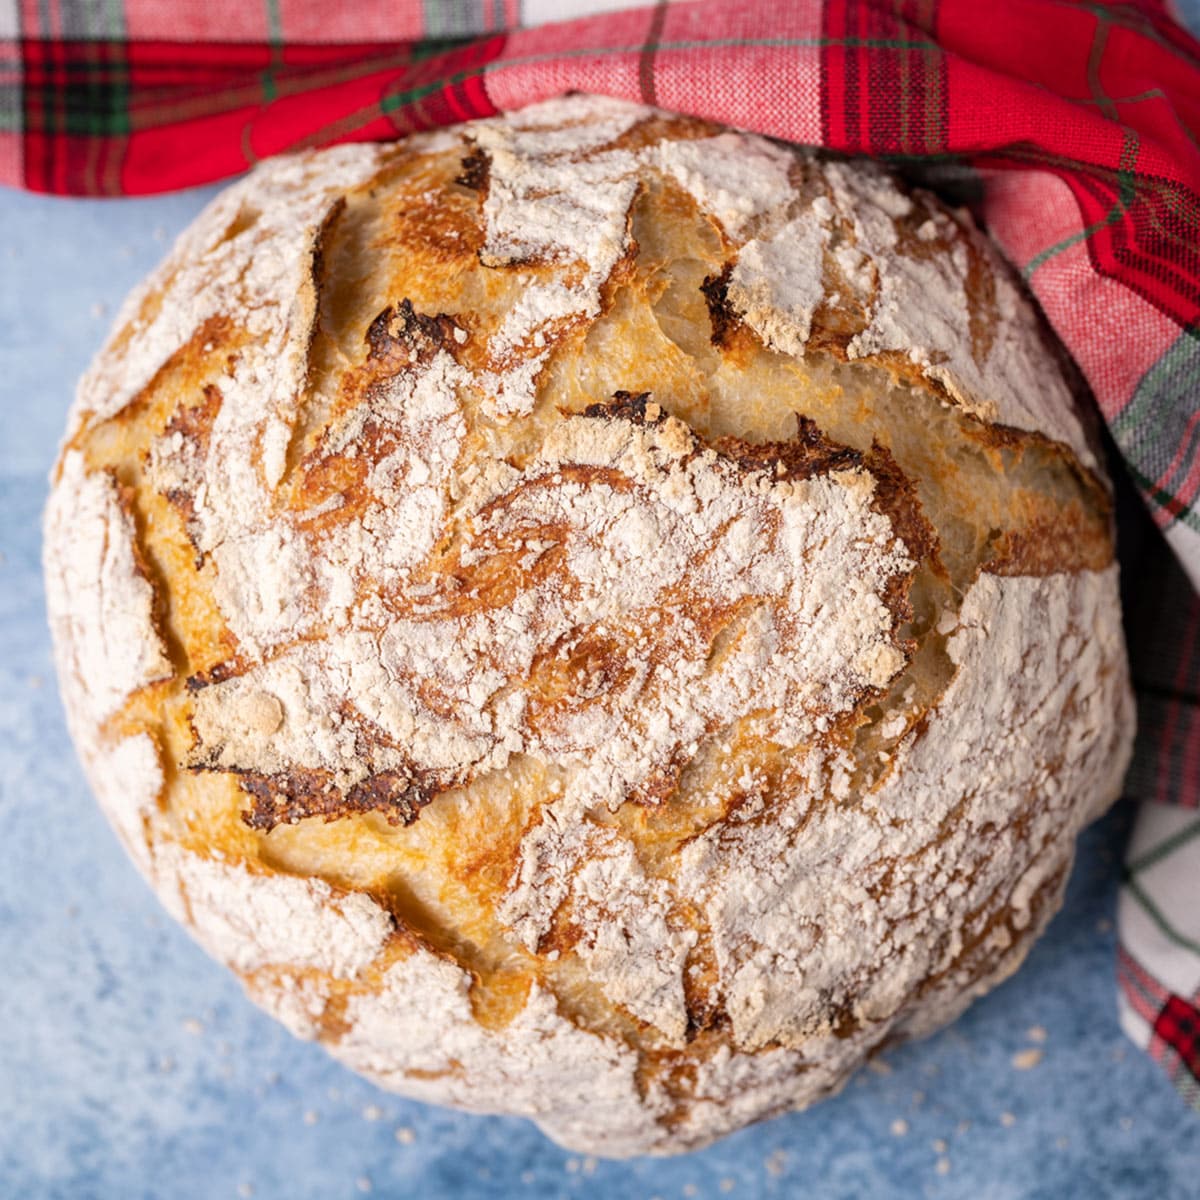
A beginner’s guide on how to make a gorgeous loaf of Artisan Sourdough Bread! Complete recipe tips for a classic sourdough bread baked in a dutch oven.
This article and recipe has been in the works for about 2 years now. When I originally started my sourdough journey by sifting through my grandma’s old cookbooks, her sourdough starters used yeast and the recipes often called for leavening agents other than just the sourdough, making them a “lazy sourdough”, like our sourdough discard focaccia.
As the past 2 years have gone by I’ve realized that a “real” sourdough starter doesn’t begin with yeast. And a classic sourdough bread recipe have yeast.
So…today I introduce to you our beautiful artisan sourdough bread recipe. This has been a rollercoaster of a ride in learning, but I’ve been through the failures and testing so you don’t have to.
I promise that if you step through my process, you’ll end up with a gorgeous loaf of homemade bread without yeast. This is the OG of sourdough recipes!
Most breads use commercial yeast to give rise to bread doughs. They are quick, easy and generally no nonsense. But what happens when you don’t have yeast on hand?
The secret to a good sourdough bread is that it uses an active “starter”, a naturally fermented mixture of flour and water that will give a beautiful rise to your baked goods…without the use of commercial yeast. Instead, it’s a wild yeast. The process takes longer but is so, so easy once you get started with it. It’s really a lot of hands off time.
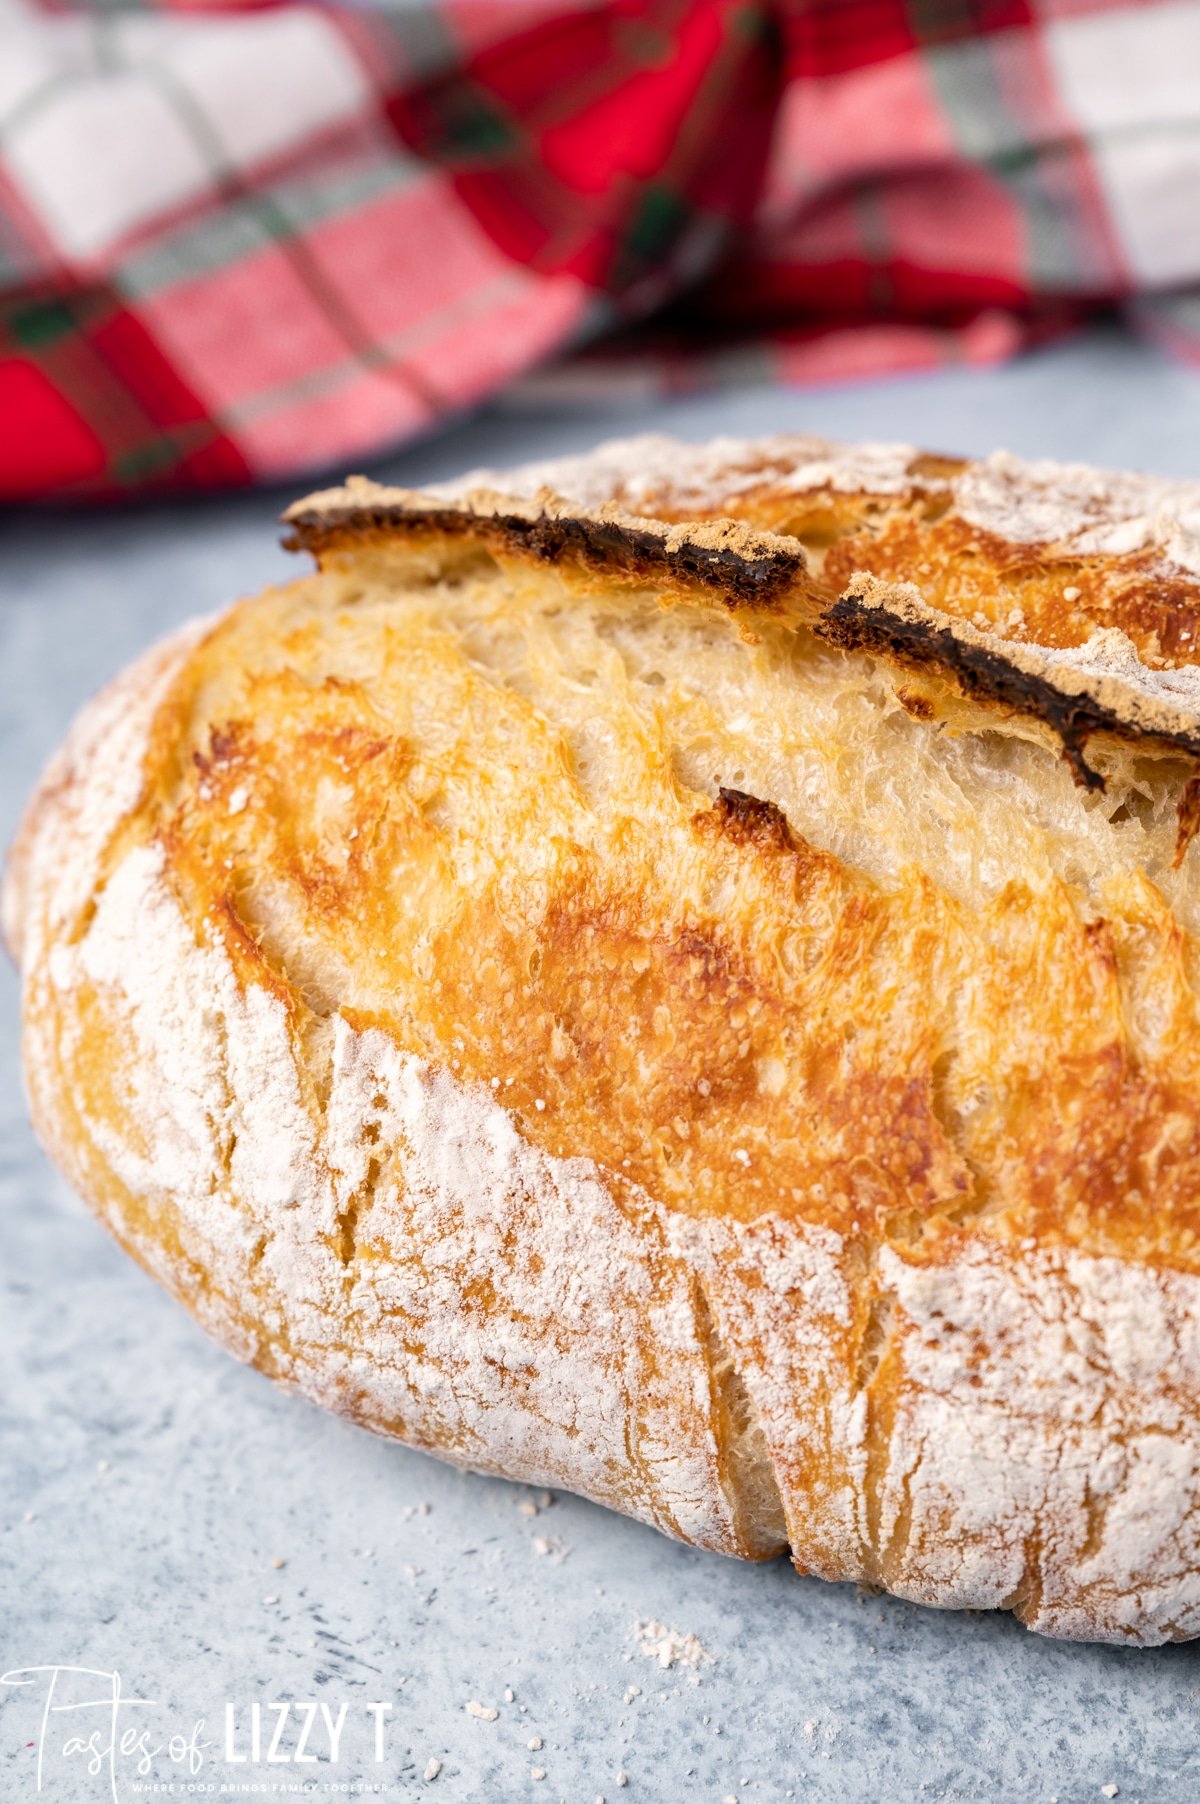
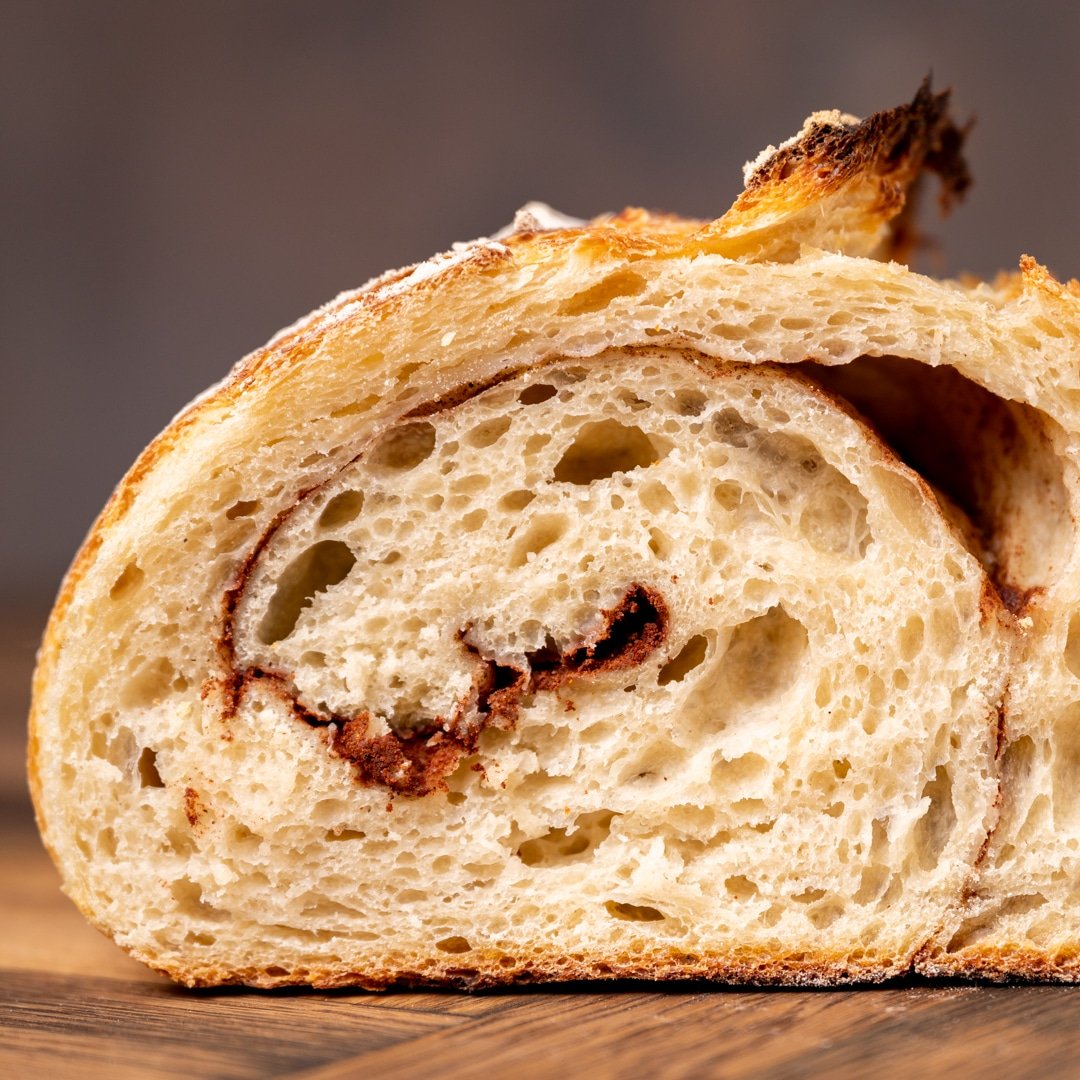
Because of the natural fermentation, the bread has a “sour”, tangy flavor with air pockets and a chewy texture. The longer you keep your sourdough starter going, the better the flavor it will have!
A classic sourdough bread recipe has just 4 ingredients: bread flour, starter, salt and water. No other ingredients needed!
Start with the Sourdough Starter
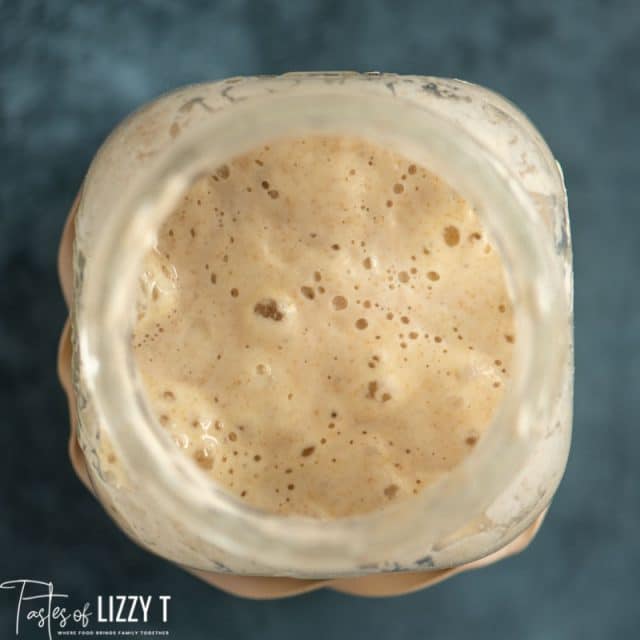
A requirement for this recipe is that you have a bubbly, active sourdough starter to work with.
We have an entire article dedicated to making homemade sourdough starter. It takes about a week. Start at that article, then once you have an starter that is bubbly and active, come back here to make bread.
What You’ll Need: Tools for Making Sourdough Bread
There are a few things you’ll need to have on hand if you want your bread to turn out in the best possible way.
kitchen scale – You can measure by volume, but for the best results, we recommend investing in a kitchen scale. It’s worth it.
glass bowl – We have several of these large glass bowls. You’ll be able to see the bulk fermentation if you use a glass bowl.
banneton basket – For higher hydration breads, these baskets give your dough a beautiful shape.
parchment paper – So your bread doesn’t stick to the baking dish.
bread lame – Make gorgeous designs in the tops of your breads with this tool!
dutch oven – Dutch ovens are necessary for those gorgeously golden brown, crispy crusts.
How do you know when sourdough starter is ready to make bread?
This is one of the most important questions when making sourdough bread. If your starter is not active and bubbly, it won’t give any rise to a loaf of bread. And no one wants to waste ingredients.
Feed your starter a few hours before you are ready to bake bread. When it has doubled and is really bubbly, it’s time to bake with. You want to bake with it before the starter deflates. This is important!
Pro Tip: Try the float test
Drop a small amount of starter into a glass of water. If the starter floats, it is ready to bake with. See the picture below.
Low Hydration vs. High Hydration
You may hear about “high hydration” and “low hydration” breads. High hydration breads means there is more water in the dough. The doughs will be stickier, may spread more (not hold their shape well) and will have larger holes in the bread once it is baked.
Low hydration breads are tighter in texture (not big holes) and will hold a nice round dome before baking.
We call this bread recipe a medium hydration. It is the perfect mix between the two for our family. Try using less water (or more flour) as you tweak this recipe to be the perfect bread for your family.
Classic Sourdough Bread Timeline
Plan about 24 hours for making this artisan sourdough bread. This is our ideal timeline:
3:00 PM – Feed Starter
7:00 PM – Mix Dough
Overnight – Bulk Fermentation
7:00 AM – Shape Dough
9 or 10:00 AM- Bake Bread
I plan my artisan sourdough bread this way because I don’t want to be up late baking bread. I’d rather let it rise overnight. You can tweak this if you’d like, but as you can see it will take almost 24 hours to make. Thankfully, most of that is hands off time.
How to Make Classic Sourdough Bread
A note about how much starter to use for a loaf of bread
You can use as little as 25 grams of starter in this recipe. However, know that it will take longer for the bulk fermentation stage. If we are running low on starter, we’ll use 50 grams. We normally have a nice amount of starter on hand so using 90 grams of starter simply allows the whole process to go a little more quickly for us.
Now let’s jump into the step-by-step instructions.
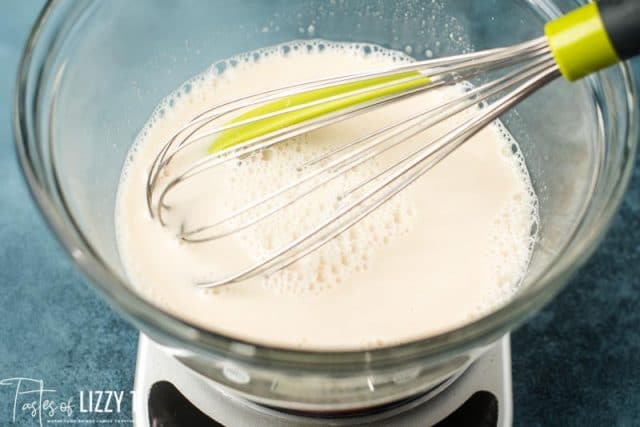
Turn on your kitchen scale. Place the glass bowl on top and press “tare” to make the display say “0”. Set to grams. Add 90 grams of active sourdough starter to the bowl. Then add 350 grams of warm water. Use a whisk to whisk the ingredients together.
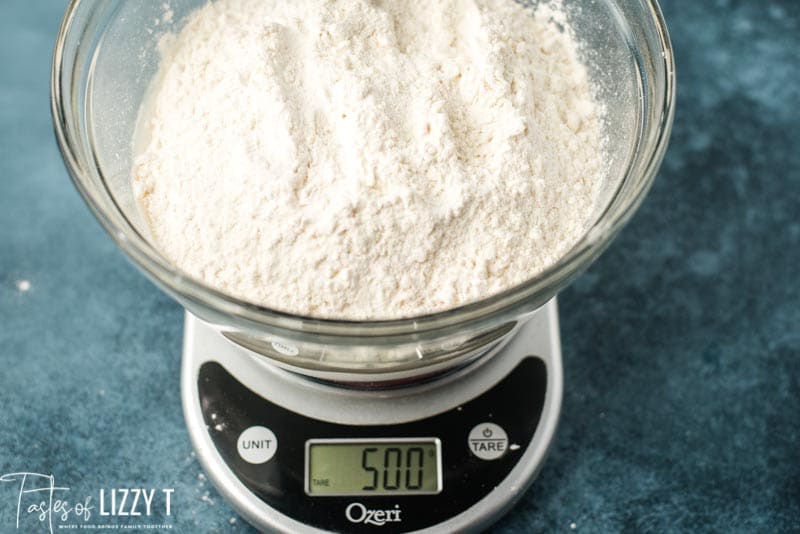
Then add 500 grams of a high quality, unbleached bread flour. This is the type of flour that will give you the best results. We have not tested other flours, only unbleached bread flour.
Lastly, add 9 grams of salt.
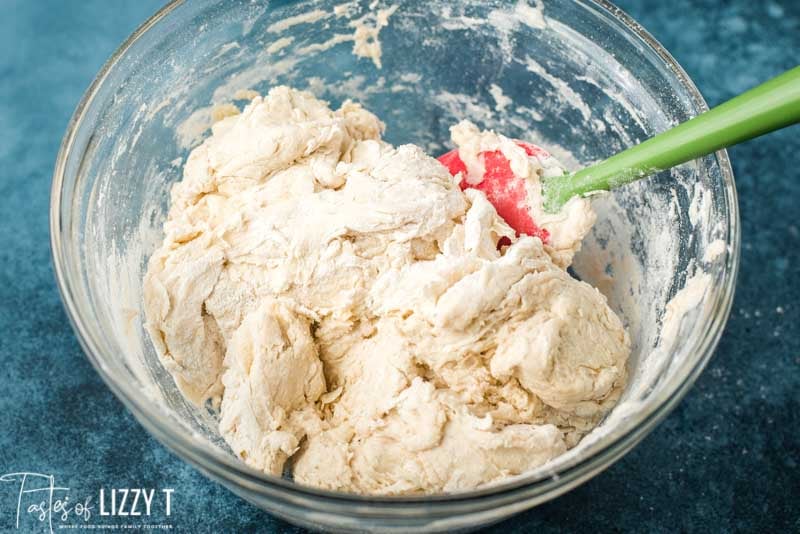
Mix these ingredients together until they form a rough, shaggy dough.
Allow the dough ball to sit for 30 minutes. This will help the gluten strands form. It’s an important step for the texture of the dough.
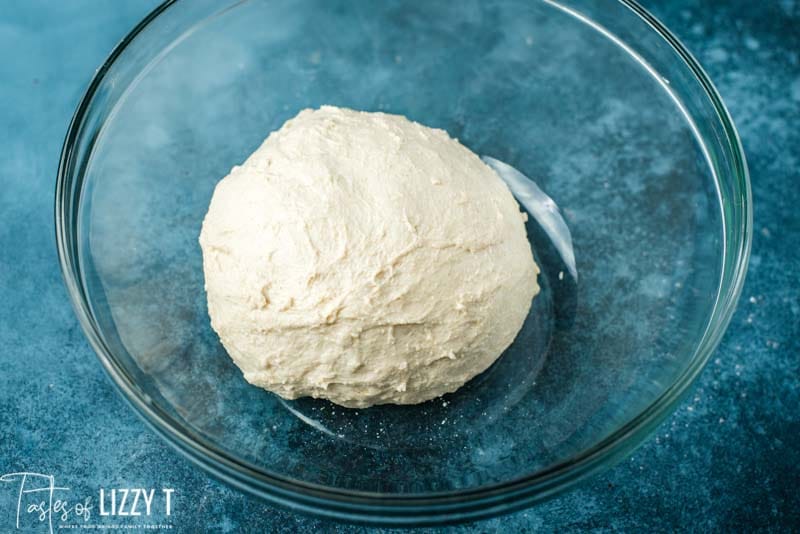
After the 30 minutes is over, use your hands to form a dough ball. This should only take about 15 seconds and isn’t necessarily “kneading” the dough, but just forming a smooth ball.
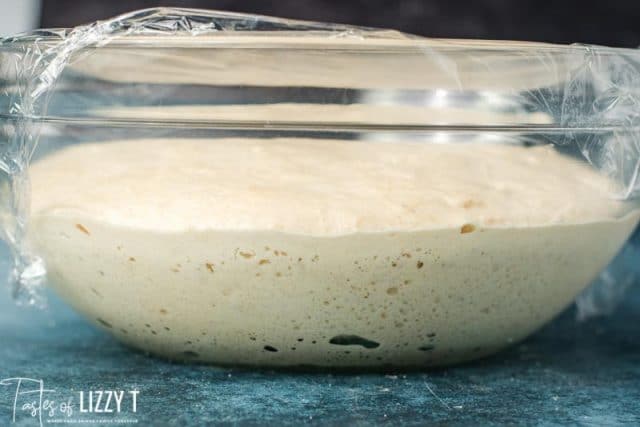
Place the dough ball back into the large bowl and cover with plastic wrap or a tea towel. Now it is time for bulk fermentation in letting the dough rest. That starter is going to make all of your bread dough bubbly and light textured. Watch it do it’s magic! Or go to sleep while it works like I do. 🙂 This step normally takes about 10-12ish hours at room temperature. It really depends on temperature and how active your starter is. The dough should be nearly doubled in size though.
You should see pretty bubbles of all sizes in the dough. That’s why we love to use a glass bowl!
Now that the dough has fully fermented, it’s time to shape it! If the dough feels super sticky, dust it lightly with flour. It’s important to note that through this shaping the dough will naturally deflate, but you don’t want to press down on it hard or knead it. Hold it gently and work with it lightly.
Start on one side and fold the dough over. Then turn the dough slightly on the work surface and fold over the next section of dough towards the center. Turn the dough again and fold again, then do it again until you’ve gone all the way around the circle. This process creates a surface tension on the outside of the dough for a nice shape.
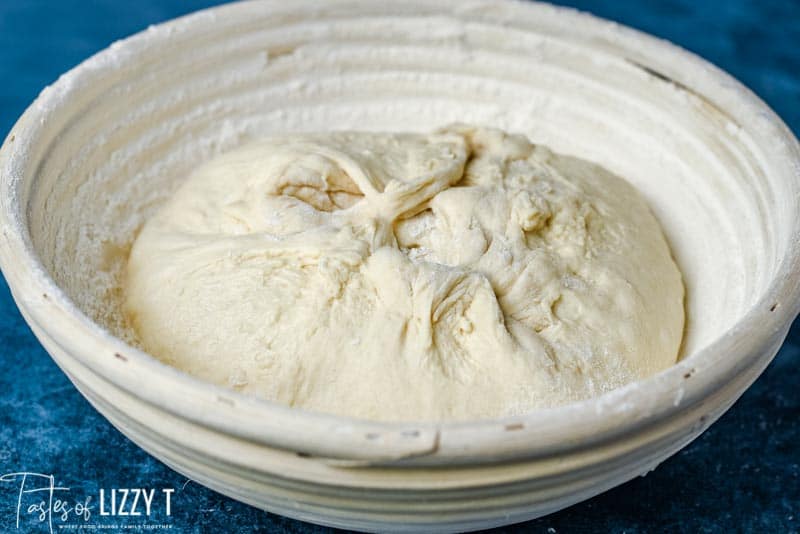
Place the dough ball, smooth side down, into a floured proofing basket. Allow the dough to sit again for another 1-3 hours. The dough should look light textured and not dense at all. It won’t fully rise to double again….just watch for the texture to lighten. Don’t let this stage go too long because you want that “oven spring” during baking, which is the final rise before the crust forms on the outside of the bread.
Preheat the oven to 450º Fahrenheit. Turn the dough out, seam-side down, onto a piece of parchment paper.Score the top of the bread with a bread lame, sharp knife or razor blade. (designs here)
Place the bread with parchment paper into a large dutch oven. Place the lid on top. Place the dutch oven in the oven and lower the temperature to 425º Fahrenheit. Bake for 40 minutes.
Then remove the lid of the dutch oven and bake without the lid for an extra 10 minutes. This will get the crust beautifully golden brown.
Do you have to use a dutch oven to bake sourdough bread?
Homemade bread bakes best when it has steam or moisture to allow it to form and rise correctly. Baking bread in a dutch oven traps that moisture and works beautifully to allow the inside of the bread to bake before the exterior dries out. It gives the crust a crispy exterior that you know and love in a sourdough bread.
So yes, we 100% recommend using a dutch oven to bake artisan sourdough bread.
What can I use sourdough bread for?
This loaf of sourdough bread is perfect as sandwich bread, for paninis, French toast, breakfast casseroles or grilled sandwiches.
Our favorite is simply when we slice it and slather it with butter and honey or peach freezer jam. So, so good!
Sourdough Discard Recipes
While you are working with your starter to get the perfect amount, don’t waste that sourdough discard! Make one of these fan favorites:
It is best if you use a kitchen scale to measure ingredients. It works best if it is measured by grams. Place a large glass bowl on a kitchen scale and set to "0".
Add 90 grams of active sourdough starter to the bowl. Add 350 grams of warm water. Use a whisk to mix the starter and water.
Add the flour and salt. Use a sourdough spoon (or a rubber spatula) to mix the ingredients together to form a rough, shaggy dough. Allow this dough to sit for 30 minutes. (This is the autolyse stage.)
Work the dough into a ball, which should only take about 15 seconds. Place the dough back in the bowl. Cover the bowl with plastic wrap and place the bowl in a warm spot to rise. This could be in indirect sunlight or in an oven with the light on. Or you can just let it sit on the counter if you keep your house warm.
Allow the dough to rise until the dough has almost doubled. This usually takes about 8 hours for us, but it will depend on how active the starter is and the temperature of the ingredients. (Most people plan for anywhere from 4-12 hours for this bulk fermentation.) If you have your dough in a glass bowl you should be able to look through to see bubbles forming all in the dough.
Carefully pull the dough out of the bowl. If it feels really sticky you may want to sprinkle the counter lightly with flour. The dough will gently deflate which is ok. You want to be careful not to punch it down or work the dough too much at this point.
Start on one side and fold the dough over. Then turn the dough slightly and fold over the next section of dough towards the center. Turn the dough again and fold again, then do it again until you've gone all the way around the circle. This process creates a surface tension on the outside of the dough for a nice shape.
Place the dough smooth side down in a floured banneton basket.
Allow the dough to rise one last time. This last rise will take anywhere from 1-3 hours. The dough should look slightly "puffy" again and light textured (not dense), but does not have to be doubled. It will rise nicely in the oven.
Preheat the oven to 450º Fahrenheit. Cut a piece of parchment paper and lay it on the counter. Turn out the dough onto the parchment paper.
Place the dough ball (with parchment paper) into a dutch oven. Place the dutch oven cover on.
Turn the oven down to 425º Fahrenheit. Then bake the bread in the covered dutch oven for 40 minutes. Remove the cover and continue to bake for another 10 minutes or until the bread is golden brown. Then remove from the oven and allow the bread to cool completely on a wire rack.
This bread will have the best flavor when it is served the next day, but it is also so good fresh from the oven. For the best texture you'll want to wait at least an hour before slicing the bread with a strong serrated knife.
Notes
*If the dough is too sticky for the environment you live in, reduce the water by 25 grams and/or increase the flour. 99% of the time, we make the recipe as written, adding in up to ½ cup more flour for kneading, as stated. It is definitely a sticky dough which is the way we like it, but you can totally add more flour if you’d like.The calories shown are based on the bread being cut into 16 pieces, with 1 serving being 1 slice of bread. Since different brands of ingredients have different nutritional information, the calories shown are just an estimate. **We are not dietitians and recommend you seek a nutritionist for exact nutritional information.**
I'm Julie Clark, CEO and recipe developer of Tastes of Lizzy T. With my B.A. in Education and over 30 years of cooking and baking, I want to teach YOU the best of our family recipes.
This was my first attempt at sourdough starter and bread. I thought I did everything right, had good active starter, followed the recipe to a T – digital scale, weighed in grams, etc, etc and yet my dough was super, super wet and sticky. I used 00 flour, so perhaps that’s the difference? I still made the bread, and it tasted great, just looked a bit like a brick and didn’t rise. Would love to know what you’d change to troubleshoot. Is there a particular flour you’d recommend?
Susy
6 years ago
Is 9 grams of salt correct?
In your other recipe that called for 1/2 tsp you stated 9 grams. I know this is by weight but that’s a lot of salt almost 2 tsps. Just making sure before trying this out.
Thank you.
Cheryl bickley
6 years ago
Is this very different in texture than regular sourdough?
Lyn Jessee
6 years ago
First time in 25 yeas making sourdough bread. Thank you for a great recipe. I still have my Grandmother’s dutch oven. It is well over 100 years old! Should I cool the bread in the dutch oven or take it out immediately to place on cooling rack?
Thanks again for a great recipe.
Chris Tweedy
6 years ago
Thanks for the recipe! I made my first loaf yesterday. Kind of a fail because the dough was really sticky and stuck to the basket (I must have been too stingy with the flour), so the loaf deflated and came out about as thick as foccacia, but it still tasted great! Good crunchy crust, and the taste of San Francisco. We must have good wild yeast in Minneapolis. Next time I’ll flour the basket really liberally, and maybe use a bit more flour in the dough. I forgot to feed the starter four hours before making the dough, but I… Read more »
sandy
6 years ago
Question: This recipe does not use a preheated Dutch Oven. Just curious if there is a good reason for not using a preheated D.O.?
Laura from San Diego
6 years ago
Great recipe! My dough overproofed on the counter last night. Great flavor, just a shapeless loaf for breakfast. I read a recipe that said to do 1st proof overnight in the fridge- do you have any experience with that?
Mike
6 years ago
I want to thank you for this recipe and instruction on making Sourdough bread! 🙂 I have been successful in making 4 loaves through your process, which came after 1 failure with a different method.
My question that I have, is that this recipe makes a fairly large loaf. Can it be widdled down to make a smaller loaf? And if so, does this change the baking time?
Nha
6 years ago
Hello,
First time sourdough baker here. I don’t have a basket is this really necessary?
Looking forward to hearing from you!
Anonymous
6 years ago
Most detailed and clearly explained recipe I have seen. Thank you.
Susie Kothari
6 years ago
Love the details in the recipe and adding this comment to rate the recipe.
Susie Kothari
6 years ago
From a very new sourdough bread baker:
I have never used banneton baskets and just bought a couple from the link you recommended.
My question: Do you use leave the fabric cover on when proofing or do you remove it?
My starter has very hydration and the dough is super sticky. Do you recommend using more than 500 gms of flour or less starter?
Dominic Tolfts
6 years ago
Hi Julie,
I’ve been successful at last with my sourdough starter but I wanted some advice on baking my first loaf without a Dutch oven. Would baking on a baking sheet with a casserole dish of water on the rack below work? Many thanks Dominic
Dan
6 years ago
Getting my starter going. Can’t wait to try this recipe for sourdough bread.
Should I spray the sides of the ditch oven so that it is non-stick or leave it dry to allow the bread to climb up on the side of the Dutch oven?
Camilla Coy
6 years ago
Hello. How do we take care of the starter if we don’t bake bread on a regular basis? Does it need to be maintained? Can’t wait to try this.
Thank you, Camilla Coy


This was my first attempt at sourdough starter and bread. I thought I did everything right, had good active starter, followed the recipe to a T – digital scale, weighed in grams, etc, etc and yet my dough was super, super wet and sticky. I used 00 flour, so perhaps that’s the difference? I still made the bread, and it tasted great, just looked a bit like a brick and didn’t rise. Would love to know what you’d change to troubleshoot. Is there a particular flour you’d recommend?
Is 9 grams of salt correct?
In your other recipe that called for 1/2 tsp you stated 9 grams. I know this is by weight but that’s a lot of salt almost 2 tsps. Just making sure before trying this out.
Thank you.
Is this very different in texture than regular sourdough?
First time in 25 yeas making sourdough bread. Thank you for a great recipe. I still have my Grandmother’s dutch oven. It is well over 100 years old! Should I cool the bread in the dutch oven or take it out immediately to place on cooling rack?
Thanks again for a great recipe.
Thanks for the recipe! I made my first loaf yesterday. Kind of a fail because the dough was really sticky and stuck to the basket (I must have been too stingy with the flour), so the loaf deflated and came out about as thick as foccacia, but it still tasted great! Good crunchy crust, and the taste of San Francisco. We must have good wild yeast in Minneapolis. Next time I’ll flour the basket really liberally, and maybe use a bit more flour in the dough. I forgot to feed the starter four hours before making the dough, but I… Read more »
Question: This recipe does not use a preheated Dutch Oven. Just curious if there is a good reason for not using a preheated D.O.?
Great recipe! My dough overproofed on the counter last night. Great flavor, just a shapeless loaf for breakfast. I read a recipe that said to do 1st proof overnight in the fridge- do you have any experience with that?
I want to thank you for this recipe and instruction on making Sourdough bread! 🙂 I have been successful in making 4 loaves through your process, which came after 1 failure with a different method.
My question that I have, is that this recipe makes a fairly large loaf. Can it be widdled down to make a smaller loaf? And if so, does this change the baking time?
Hello,
First time sourdough baker here. I don’t have a basket is this really necessary?
Looking forward to hearing from you!
Most detailed and clearly explained recipe I have seen. Thank you.
Love the details in the recipe and adding this comment to rate the recipe.
From a very new sourdough bread baker:
I have never used banneton baskets and just bought a couple from the link you recommended.
My question: Do you use leave the fabric cover on when proofing or do you remove it?
My starter has very hydration and the dough is super sticky. Do you recommend using more than 500 gms of flour or less starter?
Hi Julie,
I’ve been successful at last with my sourdough starter but I wanted some advice on baking my first loaf without a Dutch oven. Would baking on a baking sheet with a casserole dish of water on the rack below work? Many thanks Dominic
Getting my starter going. Can’t wait to try this recipe for sourdough bread.
Should I spray the sides of the ditch oven so that it is non-stick or leave it dry to allow the bread to climb up on the side of the Dutch oven?
Hello. How do we take care of the starter if we don’t bake bread on a regular basis? Does it need to be maintained? Can’t wait to try this.
Thank you, Camilla Coy