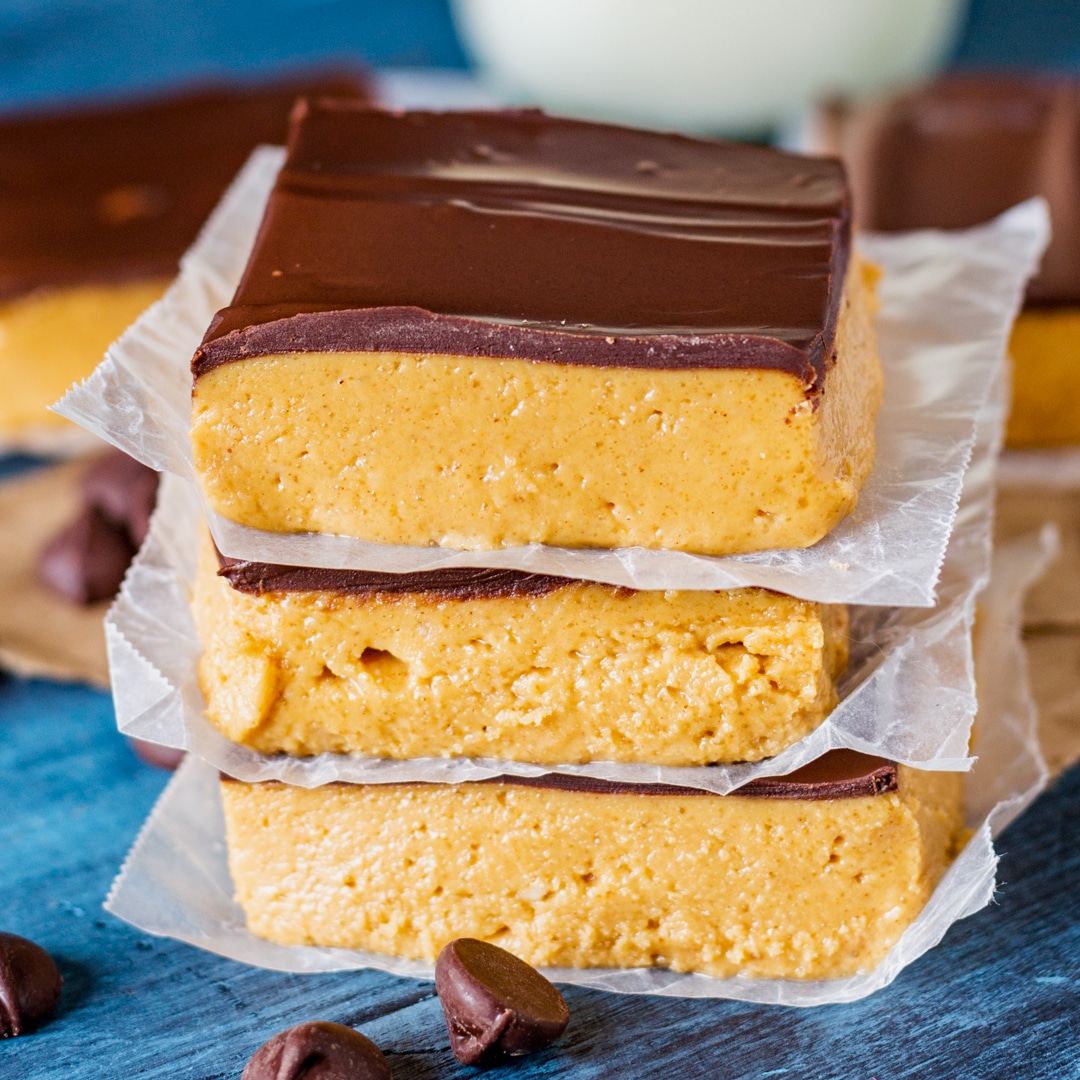
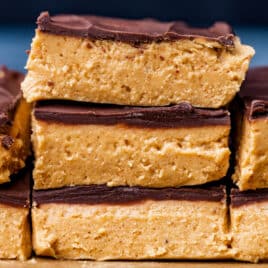
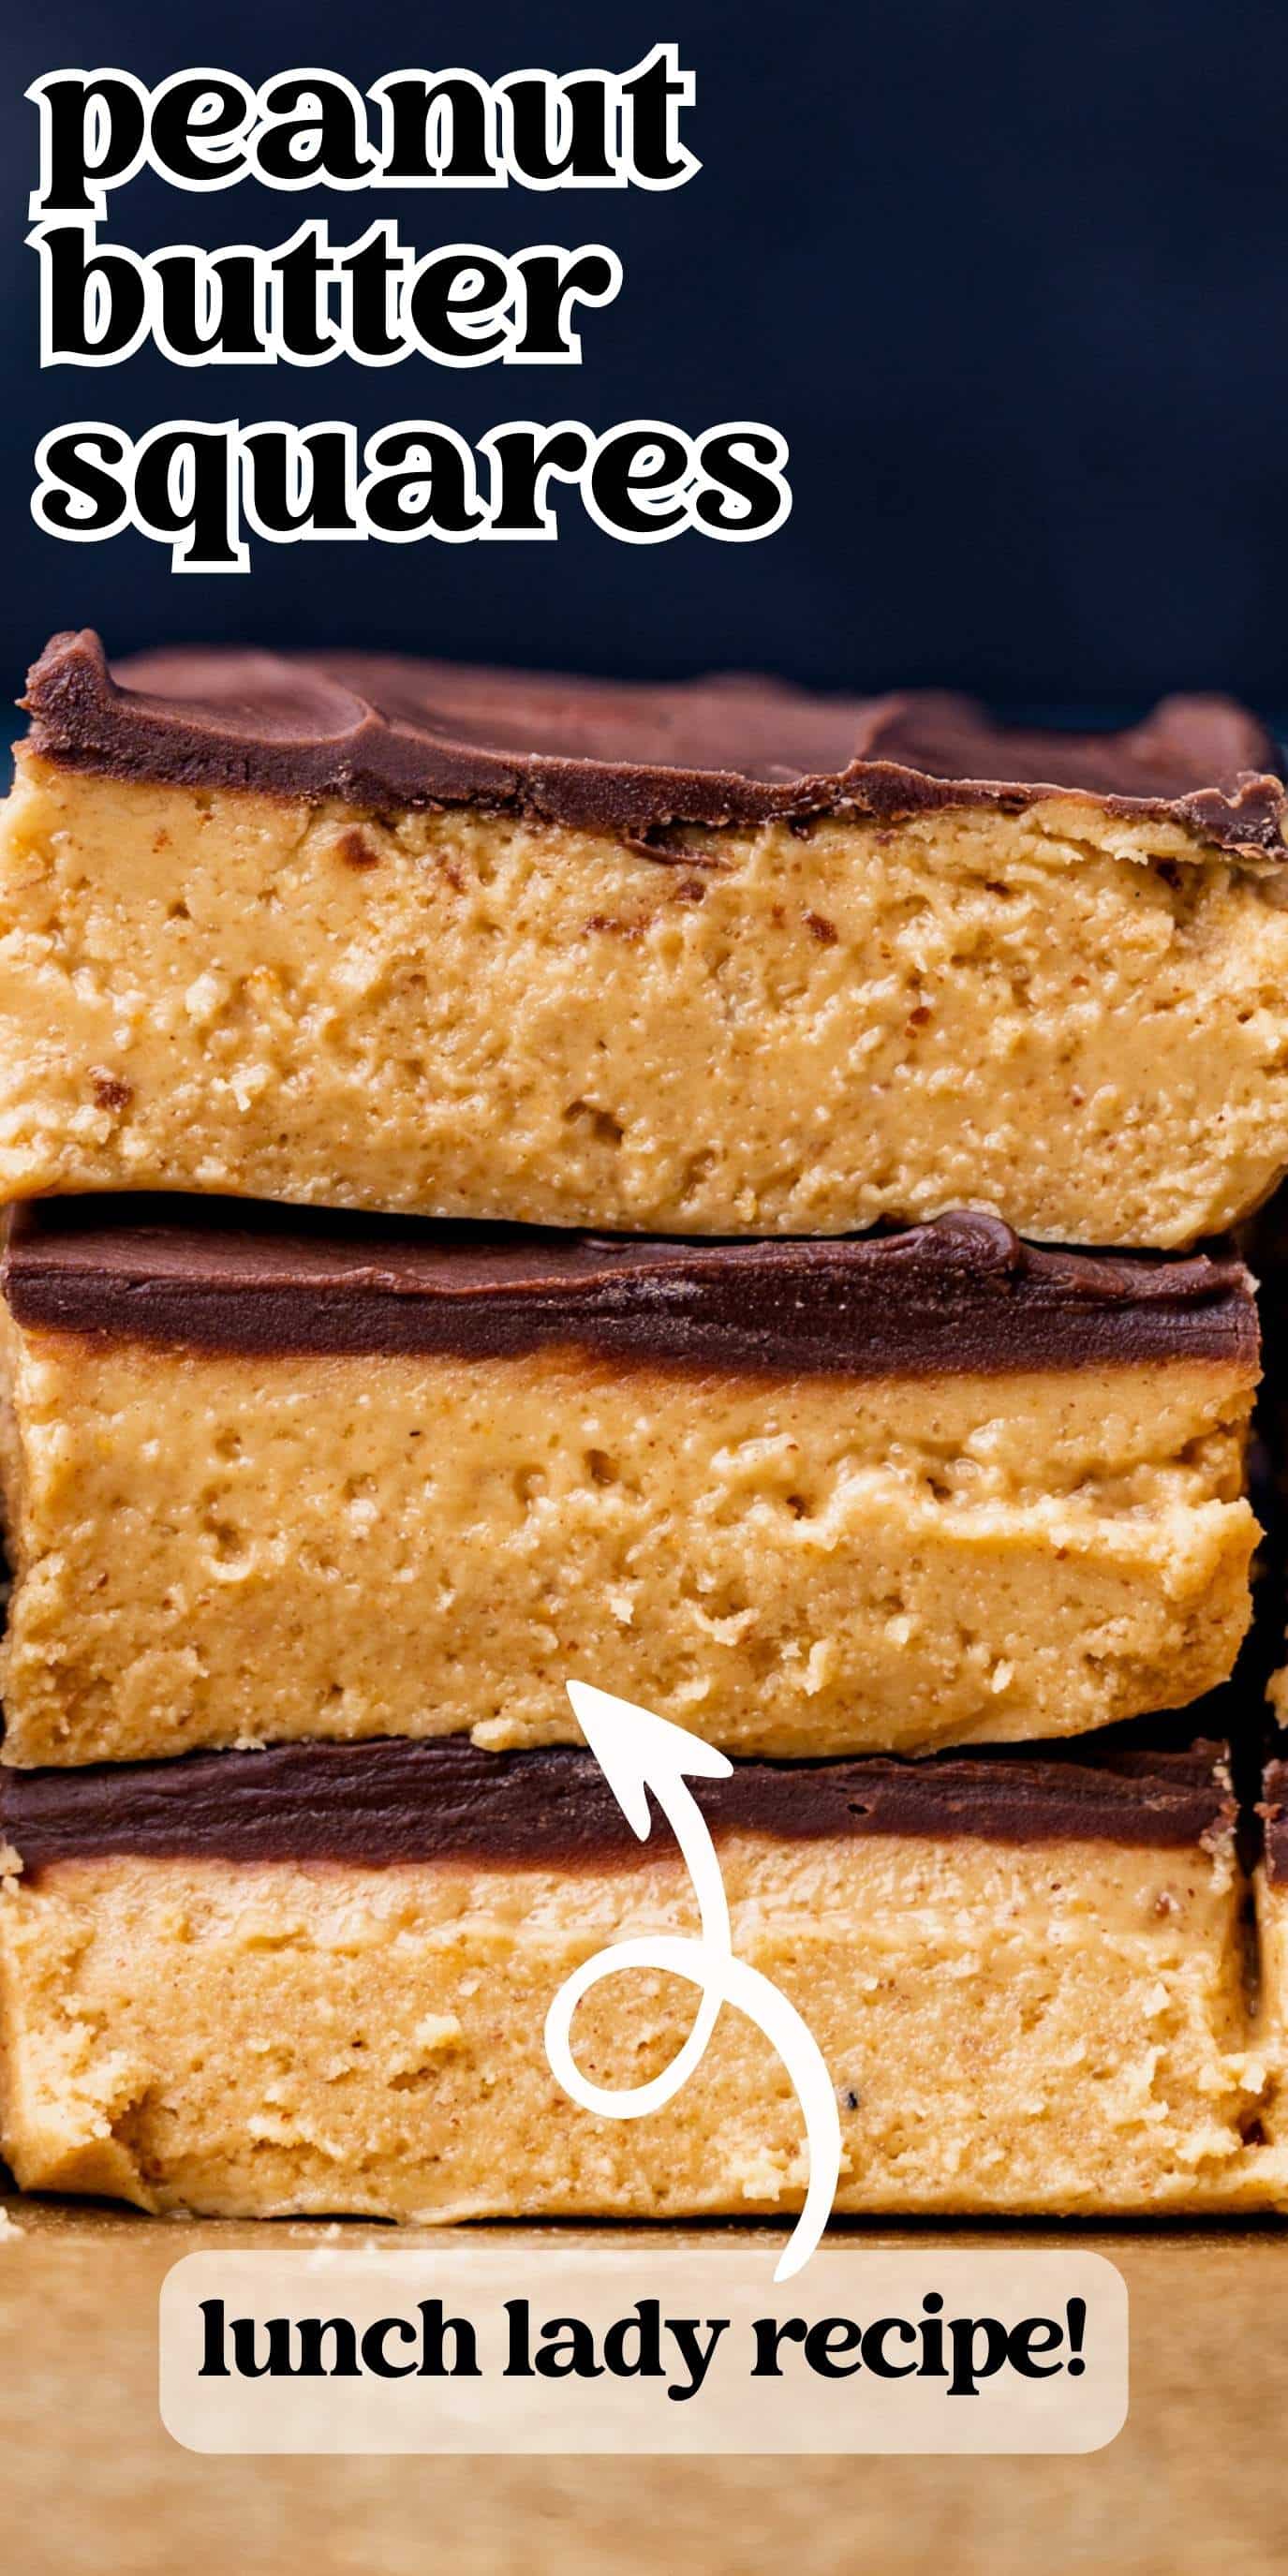
Peanut Butter Squares are the classic school lunchroom treat from your childhood. This no-bake dessert has a thick layer of peanut butter topped with a layer of chocolate. 🍫
Today I have a no bake peanut butter bars recipe for you that was one of my mom’s favorite childhood treats. She says Peanut Butter Squares were served in the lunchroom cafeteria several times a week, and she absolutely loved them. Sometimes instead of buying a lunch, she’d use her lunch money to just buy these peanut butter bars instead.
She’d never let me get away with that!
My grandma taught kindergarten at that same school so every now and then she got some to take home to my mom. And then…my grandma got the lunch ladies to give her the recipe. That’s the no bake chocolate peanut butter bars we’re sharing with you today.
About this Peanut Butter Squares Recipe:
Flavor: If you love peanut butter balls (AKA Buckeyes), then you’ll go crazy for these peanut butter squares. With creamy sweetened peanut butter with chocolate on top, they taste similar to a reese’s peanut butter cup!
Texture: The peanut butter layer is creamy, but not as smooth as buckeye candies. This recipe calls for a touch of brown sugar in the bars which deepens the flavor, but also adds just a little bit of texture to the peanut butter layer. The chocolate on top is just a very light layer, adding a little bit of a light “crust” to the bars.
When I first tried these lunch lady peanut butter bars, they reminded me of the peanut butter balls that my family makes every Christmas season. Peanut butter balls require careful and tedious work, dipping each separate ball into a pool of melted chocolate.
The result is a sugary peanut butter ball coated with milk chocolate that melts in your hand if you hold it too long. It amazed me how easy it was to make these Peanut Butter Squares. They are similar to the peanut butter balls that I love so much and are so much easier to make.
How to Make Peanut Butter Squares
This recipe is easy, but let me give you a few hints to help things go smoothly. And I’ll warn you…they may be a little messy, but they are 100% worth it.
Mix the peanut butter, butter, sugars and vanilla in a stand mixer until nice and creamy, medium speed for about 2-3 minutes. Scrape the sides of the bowl as needed. Note that the peanut butter “batter” is very soft. These do not have a firm texture like a brownie bar. The bottom layer is meant to be soft. If you’d like to make the bars firmer, add a little more powdered sugar.
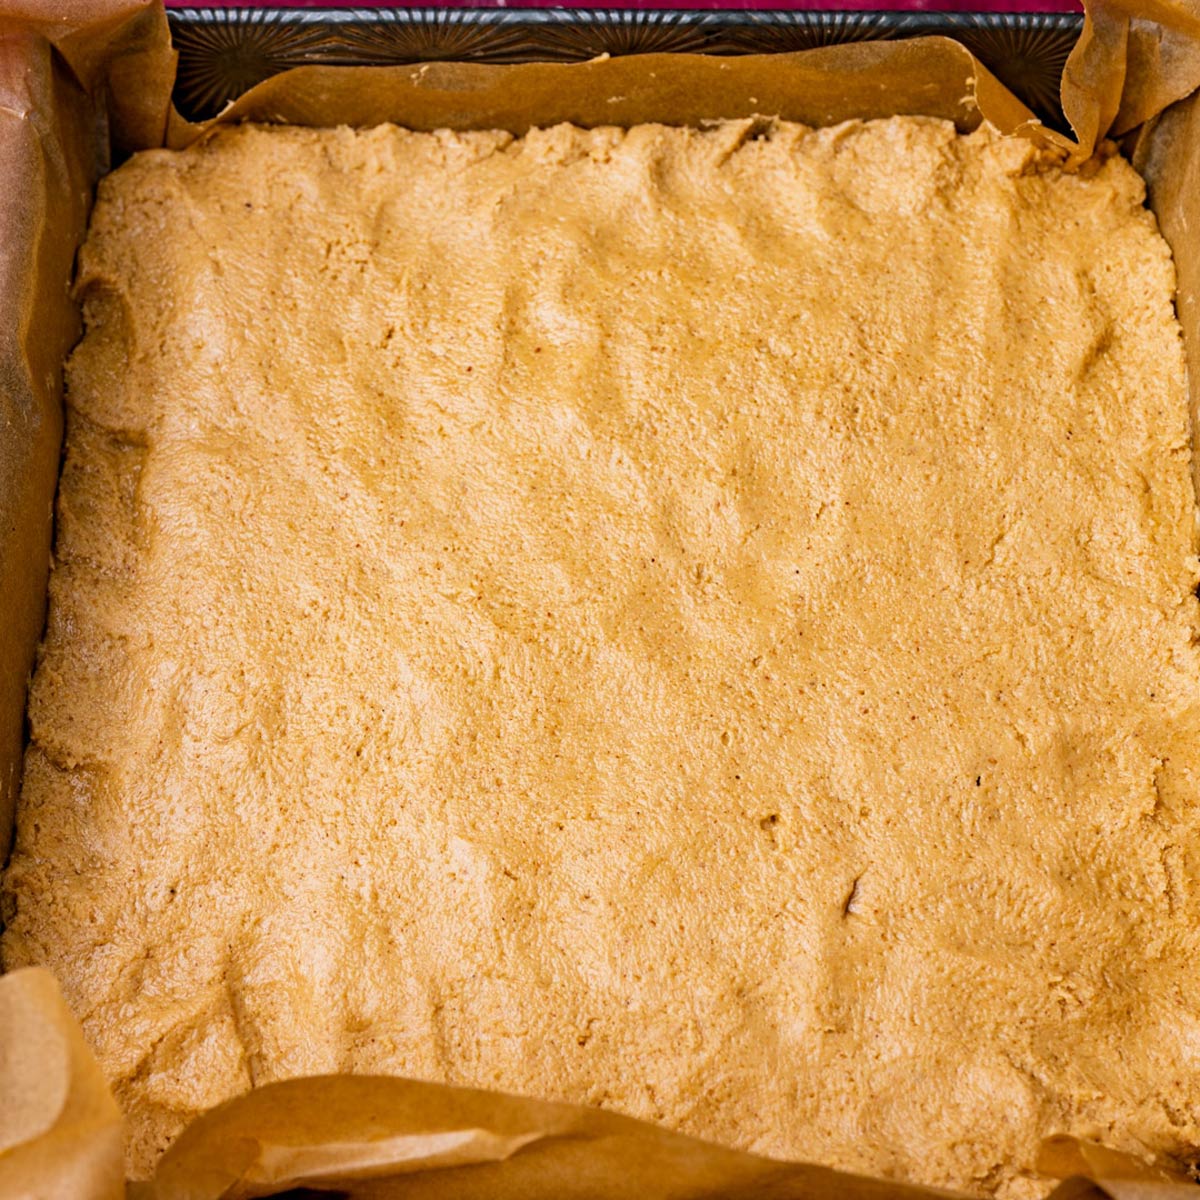
Put parchment paper in the bottom of an square 8-inch pan or 9″ square baking pan. By using parchment paper, these bars are super easy to remove and cut neatly. Plus, your pan stays clean.
Spread out the peanut butter mixture evenly in the prepared pan.
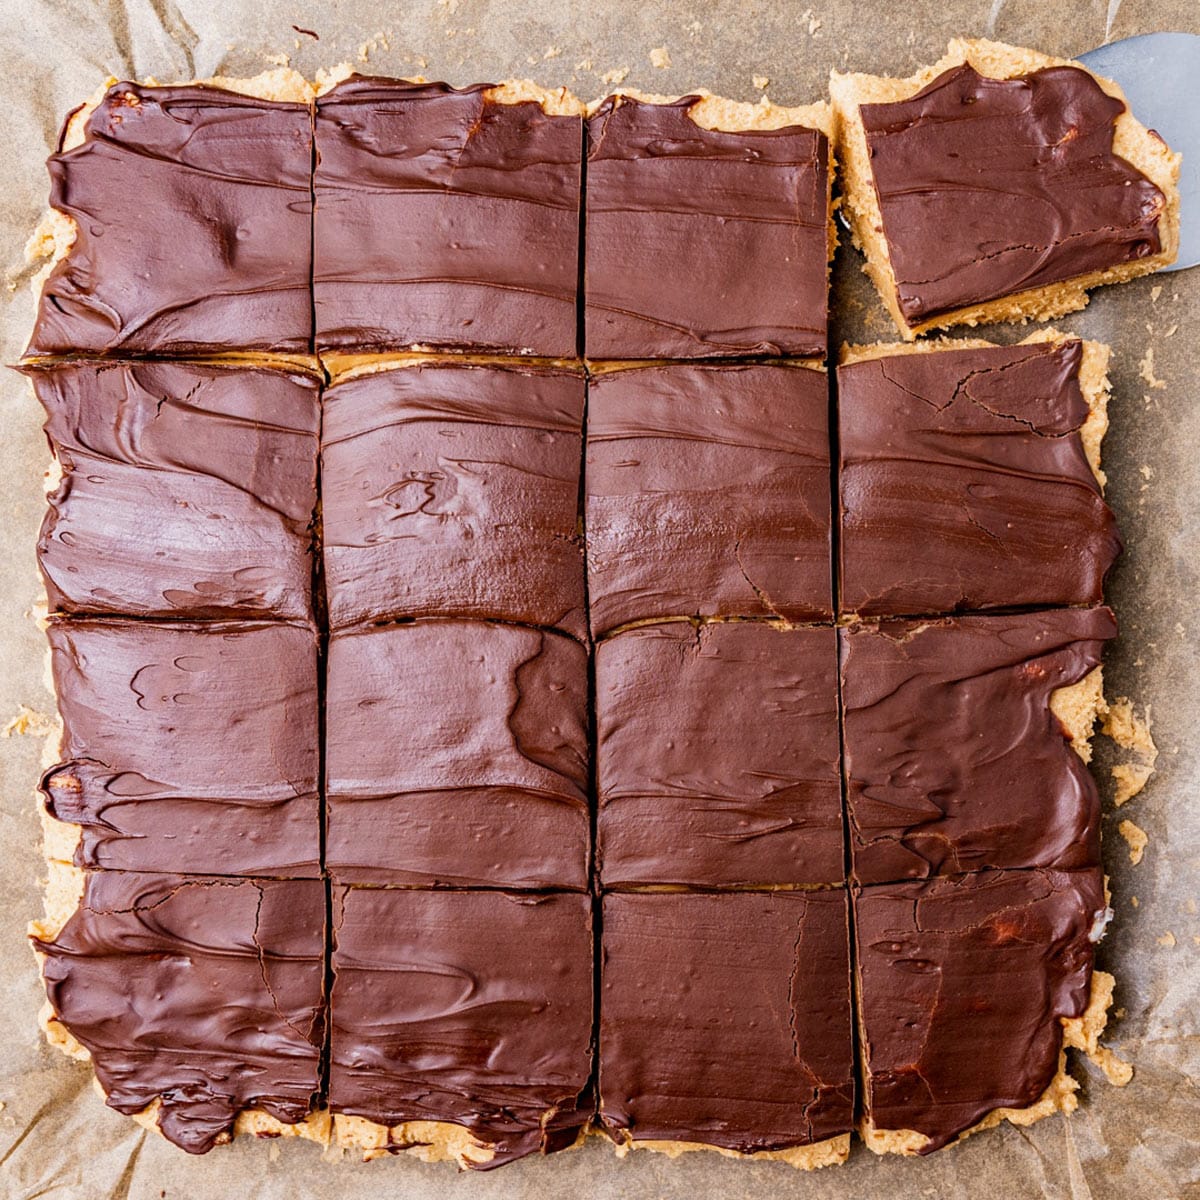
Then you simply spread melted chocolate on top of the peanut butter layer. I used Ghirardelli melting wafers so that the chocolate would melt easily and smoothly. Semi-sweet chocolate chips or a high quality chocolate bar work well, too. You can put on more chocolate if you’d like a thicker layer, but I only put on enough to hold it together. The peanut butter is the most important part for me.
Let the chocolate set slightly by letting the bars rest for about 20 minutes. Then pull up on the parchment paper to remove the bars.
How to easily cut the bars
By letting the chocolate set only for a short time, you’ll get a nice clean cut on the peanut butter squares. If the chocolate completely hardens, you might end up with some broken chocolate. This is still completely edible, but just not quite as perfectly pretty.
Lock these peanut butter squares up somewhere safe. I’m telling you….they’re addictive. And I’d love to hear if you have a favorite school lunchroom food that you remember enjoying!
Storage Instructions
Store the peanut butter squares in an airtight container at room temperature, or if it is warm in your home, chill them in the fridge.
You can also freeze the bars, but it may affect the quality of the chocolate.
Peanut Butter Squares are the classic school lunchroom treat from your childhood. This no-bake dessert has a thick layer of peanut butter topped with a layer of chocolate.
4 ouncessemi-sweet chocolateI use Ghirardelli melting wafers
1tablespoonsalted butter***optional
Instructions
Mix peanut butter, butter, sugars and vanilla in a stand mixer using the paddle attachment. Beat on medium speed for about 3 minutes, scraping the sides of the bowl as needed. The peanut butter will be very soft. If you feel it is too sticky, feel free to add a little more powdered sugar for a firmer bar. 2 cups creamy peanut butter*, ½ cup salted butter**, 1 teaspoon vanilla extract , ⅓ cup brown sugar, 3 cups powdered sugar
Place parchment paper in the bottom and up the sides of an 8×8" or 9×9" baking pan. Press the peanut butter mixture down in the bottom of the pan evenly.
Melt the melting wafers or chocolate chips in a microwave-safe bowl in 20 second increments, stirring between each interval. Be careful to melt the chocolate slowly…chocolate will burn quickly if it gets too hot. 4 ounces semi-sweet chocolate
Spread the chocolate evenly over the peanut butter mixture. Allow the bars to set for about 20 minutes. You can place in the fridge if needed, but don't forget about them and don't let the chocolate fully set or they will be hard to cut.
Pull up on the sides of the parchment paper and place the bars on a flat surface.
Cut into 16 bars (or cut smaller) and allow the chocolate to set completely.
Store the bars in an airtight container. They are great stored in the refrigerator and eaten cold.
Video
Notes
*Firmer peanut butters work best for this. I used Meijer store brand peanut butter and it was a newly opened jar. If the peanut butter is oily, it can make the bottom layer softer and hard to cut.**Don’t melt the butter at all. You just want it at room temperature. If the butter is melted, it will give the bars a weird texture.***Adding a tablespoon of butter or coconut oil to the melted chocolate can keep the chocolate softer, making it easier to cut. I usually don’t do this, but it is an option.Please note: The peanut butter layer is very soft. These do not have a firm texture like a brownie bar. The bottom layer is meant to be soft. If you’d like to make the bars firmer, add a little more powdered sugar. Some peanut butter bars recipes use crushed graham cracker crumbs. Since our school recipe did not have this listed, we do not use them.You can store these in the fridge, freezer, or just in an airtight container at room temperature. Any way you store them, they are delicious!Refer to the article above for more tips and tricks.The calories shown are based on the recipe being cut into 16 pieces, with 1 serving being 1 peanut butter square. Since different brands of ingredients have different nutritional information, the calories shown are just an estimate. **We are not dietitians and recommend you seek a nutritionist for exact nutritional information. The information in the nutrition box are calculated through a program and there is room for error. If you need an accurate count, I recommend running the ingredients through your favorite nutrition calculator.**
Keyword chocolate peanut butter, no bake dessert, school lunch
About Julie Clark
I'm Julie Clark, CEO and recipe developer of Tastes of Lizzy T. With my B.A. in Education and over 30 years of cooking and baking, I want to teach YOU the best of our family recipes.
That is a heart-warming story ( : PS ty for the recipe it is yummy
Emily Nicol
3 years ago
I’m just curious. Why did you change the recipe from the video? When I compared the one I have printed (same as video) to this one, the powdered sugar was different. It’s like 3/4 cup more.
Jenn
3 years ago
Made these today almost didn’t make it to the chocolate I kept eating the peanut butter mixture 😂😂 so delicious my school ones never had the graham cracker crumbs so I had been looking for a recipe without them because it changes the texture and taste. I am still searching for a small breakfast pizza it was a small rectangle with white cheese I assume to be mozzarella, a red sauce base, and small sausage pieces it was the only day I would get to school for breakfast! All school pizza recipes are for the ones served at lunch or… Read more »
Peanut butter?
8 years ago
Peanut butter? It’s my understanding that peanuts contain a considerable amount of lectins. I thought all of these recipes were supposed to be lectin free or at least low in lectins.
Rebecca
8 years ago
These look so good! (and so simple!) You mentioned favorite school lunchroom treats, and I definitely have some. When I was in elementary school, they did all the cooking on site. My mother knew the woman, Mrs. Near, who directed the cafeteria in my school. One of the most treasured treats was the peanut butter fudge. (My sister-in-law said, “There were FIGHTS over that fudge!!”) In any event, my mother was able to get the recipe from Mrs. Near, and the fudge has always been a hit wherever we’ve taken it. The cafeteria also served home made cinnamon rolls, deep… Read more »
Mariya
8 years ago
These PB squares are delish! they taste exactly like PB balls, except way less work with these! Very easy recipe!
Abby
9 years ago
Hi,
these sound so good…. thinking maybe they would be good if I used a thin cookie type crust for the bottom layer or even a baked graham cracker crust ?? can’t wait to try these !
Thanks
Mrs H
9 years ago
OMG – you’re mom must have gone to my school. In the 80s I swear if these were served I’d eat these over something healthy any day of the week. I have searched and searched for the recipe to no end. I even called my high school and spoke with the head cafeteria person and was told they no longer served this treat (apparently it’s the nut allergy phantom again in schools ha ha).
Thank you so much for posting these. I’m making them as soon as we receive our household goods (we’re currently in the process of moving overseas).
Joyce
9 years ago
These sound fabulous, though I know we never had them in my schools, not even all those decades ago. I’ll have to make some to share here where I live…MAYBE share 🙂 My favorite school food–more than one, actually–was the macaroni and cheese the farm women who came in to cook would make. Oh, my! That was the most delicious stuff EVER! Kids in the sixth and seventh grades (we were a tiny rural community at that time, so didn’t attend high school until eighth grade) were chosen to work in the kitchen for a week at a time during… Read more »
Katherine
9 years ago
These look so deliciously fudgey and peanut buttery!! Yum.


That is a heart-warming story ( : PS ty for the recipe it is yummy
I’m just curious. Why did you change the recipe from the video? When I compared the one I have printed (same as video) to this one, the powdered sugar was different. It’s like 3/4 cup more.
Made these today almost didn’t make it to the chocolate I kept eating the peanut butter mixture 😂😂 so delicious my school ones never had the graham cracker crumbs so I had been looking for a recipe without them because it changes the texture and taste. I am still searching for a small breakfast pizza it was a small rectangle with white cheese I assume to be mozzarella, a red sauce base, and small sausage pieces it was the only day I would get to school for breakfast! All school pizza recipes are for the ones served at lunch or… Read more »
Peanut butter? It’s my understanding that peanuts contain a considerable amount of lectins. I thought all of these recipes were supposed to be lectin free or at least low in lectins.
These look so good! (and so simple!) You mentioned favorite school lunchroom treats, and I definitely have some. When I was in elementary school, they did all the cooking on site. My mother knew the woman, Mrs. Near, who directed the cafeteria in my school. One of the most treasured treats was the peanut butter fudge. (My sister-in-law said, “There were FIGHTS over that fudge!!”) In any event, my mother was able to get the recipe from Mrs. Near, and the fudge has always been a hit wherever we’ve taken it. The cafeteria also served home made cinnamon rolls, deep… Read more »
These PB squares are delish! they taste exactly like PB balls, except way less work with these! Very easy recipe!
Hi,
these sound so good…. thinking maybe they would be good if I used a thin cookie type crust for the bottom layer or even a baked graham cracker crust ?? can’t wait to try these !
Thanks
OMG – you’re mom must have gone to my school. In the 80s I swear if these were served I’d eat these over something healthy any day of the week. I have searched and searched for the recipe to no end. I even called my high school and spoke with the head cafeteria person and was told they no longer served this treat (apparently it’s the nut allergy phantom again in schools ha ha).
Thank you so much for posting these. I’m making them as soon as we receive our household goods (we’re currently in the process of moving overseas).
These sound fabulous, though I know we never had them in my schools, not even all those decades ago. I’ll have to make some to share here where I live…MAYBE share 🙂 My favorite school food–more than one, actually–was the macaroni and cheese the farm women who came in to cook would make. Oh, my! That was the most delicious stuff EVER! Kids in the sixth and seventh grades (we were a tiny rural community at that time, so didn’t attend high school until eighth grade) were chosen to work in the kitchen for a week at a time during… Read more »
These look so deliciously fudgey and peanut buttery!! Yum.